Generate TypeScript Definition Automatically

TypeLITE generates Interface definition from C# classes specified in T4 pattern.

How To Use

Set TsClassAttribute (+ module name) to DTO classes.

using TypeLite;

[TsClass(Module = "module1")]
public class Sample1
{
    public int Value { get; set; }
    public Enum1 Type { get; set; }
}

[TsEnum(Module = "module1")]
public enum Enum1
{
    First = 1,
    Second = 2
}

Generated Code

TypeLite.Net.d.ts

declare module module1 {
    interface Sample1 {
        Value: number;
        Type: module1.Enum1;
    }
}

Enum.ts

module module1 {
    export enum Enum1 {
        First = 1,
        Second = 2
    }
}

AngularJS $resource in TypeScript

AnuglarJS’s $resource service is available in TypeScript with adding reference for DefinitelyTyped file.

/// 

var productRepository = $resource('http://localhost:44312/api/products/:id', { id: '@Id' });
$scope.products = productRepository.query();

Enable Intellisense

Intellisense for properties are enabled according to the defined type.

/// <reference path="typings/angularjs/angular.d.ts" />

interface Product {
  Id: number;
  Name: string;
  Price: number;
}

app.controller('myCtrl', function ($scope, $resource) {
    var productRepository = $resource<Product>('http://localhost:44312/api/products/:id', { id: '@id' });

    $scope.updatePrice = function(productId, newPrice){
        var product = productRepository.get({ id: productId });
        // Intellisense enabled
        product.Price = newPrice;
        product.$save();
    };
}

However, intellisense for $save, $remove and other $resource methods are disabled in this way.

Enable Intellisense for both properties and $resource methods

Intellisense for both properties and $resource methods will be enabled for a type derived from IResourceClass.
IResourceClass is generic and T must be specified as derived class name (“Product”).

interface Product extends IResourceClass<Product>{
  Id: number;
  Name: string;
  Price: number;
}

Call ASP.NET WebApi from AngularJS

AngularJS’s $resouce service makes integrating WebAPI with client applications easier.
This post introduces an example of ASP.NET WebAPI as follows.

Implement ASP.NET WebAPI

ProductsController.cs

public class ProductsController : ApiController
{
    // GET api/products
    public IEnumerable<Product> GetProducts()
    {
        return db.Products.AsEnumerable();
    }
}

Web.config
<system.webServer>
    <httpProtocol>
        <customHeaders>
            <add name="Access-Control-Allow-Origin" value="*" />
            <add name="Access-Control-Allow-Headers" value="Content-Type" />
            <add name="Access-Control-Allow-Methods" value="GET, POST, PUT, DELETE, OPTIONS" />
        </customHeaders>
    </httpProtocol>
<system.webServer>

$resouce service

JavaScript file (using AngularJS)

var productRepository = $resource('http://localhost:44312/api/products/:id', { id: '@Id' });
// Call "GET /api/products"
$scope.products = productRepository.query();

View html

<ul>
    <li ng-repeat="product in products">{{product.name}}</li>
</ul>

$save() and $remove() methods

productRepository.query() returns an array of deserialized objects.
AngularJS adds CRUD methods ($save, $remove, etc…) to these objests.

For example:

product.name = "New Name";
product.$save();

$save() sends “POST /api/products/1” request with setting “{“id”:1,”name”:”New Name”}” to the request body.
Similarly, product.$remove() sends “DELETE /api/products/1” request.
Recognize Handwriting Letters on InkCanvas

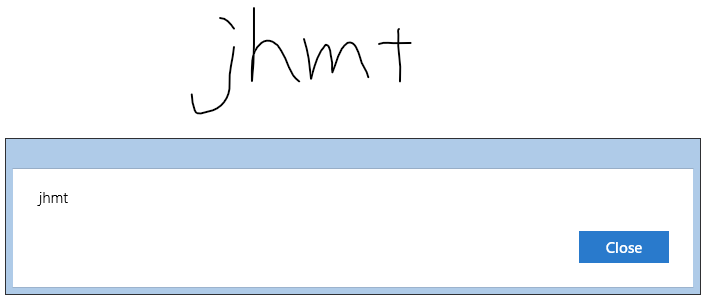
Handwriting letters on InkCanvas controls can be recognized as follows.

XAML

<InkCanvas x:Name="inkCanvas" />

Recognition

namespace MyApp
{
    using Windows.UI.Core;

    public sealed partial class MainPage : Page
    {
        public MainPage()
        {
            InitializeComponent();
            inkCanvas.InkPresenter.InputDeviceTypes = CoreInputDeviceTypes.Mouse | CoreInputDeviceTypes.Touch | CoreInputDeviceTypes.Pen;
        }        

        private void button_Click(object sender, RoutedEventArgs e)
        {
            ShowRecognizedText();
        }

        private async void ShowRecognizedText()
        {
            var inkRecContainer = new InkRecognizerContainer();
            if (inkCanvas.InkPresenter.StrokeContainer.GetStrokes().Count > 0)
            {
                var result = await inkRecContainer.RecognizeAsync(inkCanvas.InkPresenter.StrokeContainer, InkRecognitionTarget.All);
                if (result != null)
                {
                    var dlg = new Windows.UI.Popups.MessageDialog(result.FirstOrDefault().GetTextCandidates().FirstOrDefault());
                    await dlg.ShowAsync();
                }
            }
        }
    }
}

Result


Change Resources Dynamically - Universal Windows Platform (UWP) Apps

INotifyPropertyChanged interface enables to change 2 or more resource (.resw) files dynamically in Universal Windows Platform (UWP) Apps.

Example

Resources.resw


Resources.de.resw


Implement INotifyPropertyChanged

In order to manage resources in one class, implement INotifyPropertyChanged class as like the following 2 classes, ResourceService and ResourceManager.

namespace MyApp
{
    using System.ComponentModel;
    using System.Runtime.CompilerServices;
    using Windows.ApplicationModel.Resources;

    public class ResourceService : INotifyPropertyChanged
    {
        #region Singleton Members
        private static readonly ResourceService _current = new ResourceService();

        public static ResourceService Current
        {
            get { return _current; }
        }
        #endregion

        #region INotifyPropertyChanged Members
        public event PropertyChangedEventHandler PropertyChanged;

        protected virtual void RaisePropertyChanged([CallerMemberName] string propertyName = null)
        {
            if (PropertyChanged != null)
            {
                PropertyChanged(this, new PropertyChangedEventArgs(propertyName));
            }
        }
        #endregion

        readonly ResourceManager _resourceManager = new ResourceManager();

        public ResourceManager ResourceManager
        {
            get { return _resourceManager; }
        }

        public void ChangeCulture(string name)
        {
            ResourceManager.ResourceLoader = ResourceLoader.GetForCurrentView(string.Concat("Resources.", name));
            this.RaisePropertyChanged("ResourceManager");
        }
    }

    public class ResourceManager
    {
        private ResourceLoader _resourceLoader = ResourceLoader.GetForCurrentView();

        public ResourceLoader ResourceLoader
        {
            get { return _resourceLoader; }
            set { _resourceLoader = value; }
        }
        public string HelloWorld
        {
            get { return ResourceLoader.GetString("HelloWorld"); }
        }
    }
}

Binding

Bind properties of ResourceManager in XAML file like this:

MainPage.xaml.cs

public MainPage()
{
    InitializeComponent();
    this.DataContext = ResourceService.Current;
}
MainPage.xaml
<TextBox x:Name="textBox" Text="{Binding Path=ResourceManager.HelloWorld, Mode=OneWay}" />

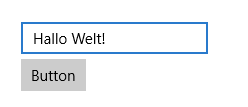
Switch Hello World!

Now the text can be changed dynamically by calling ResourceService.ChangeCulture method:

Before:


MainPage.xaml.cs

private void button_Click(object sender, RoutedEventArgs e)
{
    ResourceService.Current.ChangeCulture("de");
}

After:


Convert MongoDB BsonTimestamp to C# DateTime

MongoDB’s Timestamp is the elapsed seconds since the Unix epoch (1970/1/1). Therefore, the conversion from Timestamp to DateTime with using C# and .NET MongoDB Driver 2.0 is like this:

DateTime datetime = new DateTime(1970, 1, 1).AddSeconds(bsonTimestamp.Timestamp);

Timestamp Format

According to the MongoDB Manual 3.0, the first integer value is the elapsed seconds since the Unix epoch. The second one is an ordinal number to make the Timestamp unique.

For example:

Timestamp(1406171938, 1) 

So, 1406171938 is the elapsed seconds, 1 is just an ordinal number.

Emulating LEAD Function in MySQL

LEAD function can be emulated in MySQL with using LIMIT clause.

Example:

|  Id  |  Batch_Id  | Start Date | End Date
-------------------------------------------
|  1   |  bat1     | 2015-11-01 |
|  2   |  bat1     | 2015-11-04 |
|  3   |  bat2     | 2015-11-02 |
|  4   |  bat2     | 2015-11-05 |
|  5   |  bat3     | 2015-11-03 |
|  6   |  bat3     | 2015-11-06 |
|  7   |  bat2     | 2015-11-10 |

End Date column of each record needs to be updated with Start Date values of NEXT records.

Update with Emulated LEAD Function in MySQL

UPDATE Batch_Log bl
INNER JOIN 
(select 
 Id, 
 (select b.Date_Start
  from Batch_Log b
  where b.Batch_Id=a.Batch_Id
    and b.Date_Start > a.Date_Start
  order by b.Date_Start Limit 1) as endDate
  from Batch_Log a
  order by Id, Date_Start) lead
ON bl.Id = lead.Id
SET bl.Date_End = lead.endDate
;

SQL Fiddle

LEAD Function

LEAD function is one of the best options to update PREVIOUS records. (SQL Server 2012 or newer version required)

Example:

|  Id  |  BatchId  | Start Date | End Date
-------------------------------------------
|  1   |  bat1     | 2015-11-01 |
|  2   |  bat1     | 2015-11-04 |
|  3   |  bat2     | 2015-11-02 |
|  4   |  bat2     | 2015-11-05 |
|  5   |  bat3     | 2015-11-03 |
|  6   |  bat3     | 2015-11-06 |
|  7   |  bat2     | 2015-11-10 |

End Date column of each record needs to be updated with Start Date values of NEXT records.

Update with LEAD Function

UPDATE b
SET b.EndDate = lead.StartDate
FROM BatchLog AS b
INNER JOIN 
(
  SELECT 
  Id
  , LEAD(StartDate) OVER (PARTITION BY BatchId ORDER BY StartDate) LeadDate
  FROM BatchLog
) AS lead ON b.Id = lead.Id

SQL Fiddle

RoleManager in ASP.NET Identity 2.0

ASP.NET Identity 2.0 has been included in the standard template since Visual Studio 2013.
It’s available in MVC and WebAPI as ONE ASP.NET.

Where is Role?

Role based access control has managed user access since Form Authentication but it’s missing in the current template.
Just adding some code snippets to the template as follows in order to enable this.

Models/IdentityModels.cs

public class ApplicationRole : IdentityRole
{
}

App_Start/IdentityConfig.cs

public class ApplicationRoleManager : RoleManager<ApplicationRole, string>
{
    public ApplicationRoleManager(IRoleStore<ApplicationRole, string> store)
        : base(store)
    {
    }
    public static ApplicationRoleManager Create(IdentityFactoryOptions<ApplicationRoleManager> options, IOwinContext context)
    {
        var dbContext = context.Get<ApplicationDbContext>();
        var roleStore = new RoleStore<ApplicationRole>(dbContext);
        var manager = new ApplicationRoleManager(roleStore);

        // Add some roles (e.g. "Administrator") if needed
        if (!manager.Roles.Any(r => r.Name == "Administrator"))
        {
            manager.Create(new ApplicationRole
            {
                Name = "Administrator"
            });
        }
        return manager;
    }
}

Models/IdentityModels.cs

public partial class Startup
{
    public void ConfigureAuth(IAppBuilder app)
    {
        app.CreatePerOwinContext(ApplicationDbContext.Create);
        app.CreatePerOwinContext<ApplicationUserManager≥(ApplicationUserManager.Create);

        // Add this line
        app.CreatePerOwinContext<ApplicationRoleManager>(ApplicationRoleManager.Create);
    }
}

Controllers/AccountController.cs

public class AccountController : Controller
{
    private ApplicationUserManager _userManager; 
    private ApplicationRoleManager _roleManager;

    public AccountController()
    {
    }

    public AccountController(ApplicationUserManager userManager, ApplicationRoleManager roleManager, ApplicationSignInManager signInManager)
    {
        UserManager = userManager;
        RoleManager = roleManager;
        SignInManager = signInManager;
    }

    public ApplicationRoleManager RoleManager
    {
        get
        {
            return _roleManager ?? HttpContext.GetOwinContext().Get<ApplicationRoleManager>();
        }
        private set
        {
            _roleManager = value;
        }
    }
}

If DB is existing, it’s need to be renewed.
Execute the following commands in Package Manager

PM> Enable-Migrations
PM> Add-Migration "AddRole"
PM> Update-Database

Binding 3 or more values to DropDownList

“Download” link can be generated by HTML5’s “a” tag with “download” attribute OR JavaScript code.

DropDown list (“<select>”) element can bind values only into its display texts and values.
In the following example, the dropdown list binds 3 values with using “#” as a delimiter in ASP.NET MVC.

Model

public class ListItem
{
    public string DisplayText { get; set; }
    public string ItemValue1 { get; set; }
    public string ItemValue2 { get; set; }
}

ViewModel

List<ListItem> Items { get; set; }

View


@Html.DropDownListFor(
    model => model.SomeVal, 
    new SelectList(Model.Items.Select(i => new { Text = i.DisplayText, Value = string.Concat(i.ItemValue1, "#", i.ItemValue2) }), 
    "Value", 
    "Text", 
    new { id = "dropdown" })
)

Getting the selected value1 and value2 in JavaScript: JSFiddle

var selected = $('#dropdown :selected').val();
var splited = selected.split("#");
var value1 = splited[0];
var value2 = splited[1];